


Luxury Bathroom Remodel Ideas for North Shore Homes
On this page
Most primary bathroom remodels on the North Shore come down to a handful of decisions that compound on each other: where the light goes, whether the tub stays, how much tile work the shower gets, and whether the hardware reads as a coherent set or an afterthought. The total spend matters less than getting those decisions right. Our bathroom remodeling services page outlines how we scope, phase, and plan primary bathroom projects on the North Shore.
This covers each of those areas with specific decisions to make and discuss with your contractor. If you are drawn to a warmer, nature-inspired direction, our guide to organic bathroom design covers that approach in depth. For small bathroom remodel ideas in tighter spaces, there is a dedicated guide for that as well.
Lighting Is the Most Overlooked Element in a Bathroom Remodel
Most bathroom lighting plans stop at a single overhead fixture and a basic vanity bar. That produces flat, harsh light that makes the space feel utilitarian regardless of how much was spent on tile and fixtures.
A well-lit primary bathroom uses at least three layers:
Ambient lighting provides overall illumination. Recessed fixtures on a dimmer are standard. In a larger primary bathroom, a ceiling-mounted statement fixture gives the room visual weight without competing with the vanity.
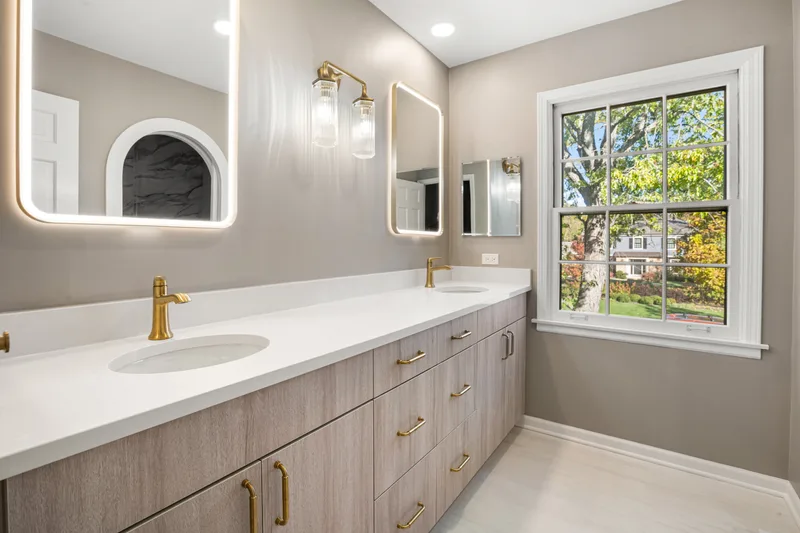
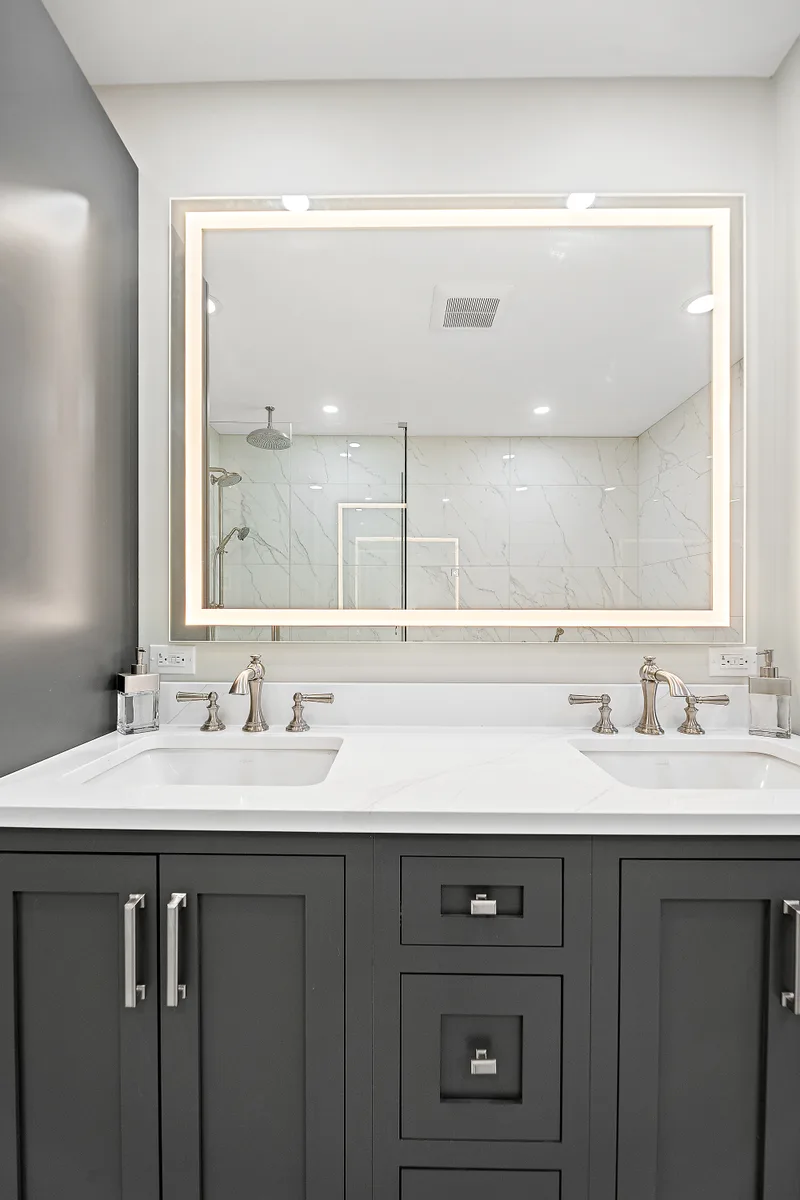
Task lighting at the vanity is where most plans go wrong. Wall sconces mounted at eye level on either side of the mirror, not above it, eliminate facial shadows for grooming. The NKBA specifies the ideal mounting height as 60 to 65 inches from the floor to the center of the fixture. A single bar mounted above the mirror casts shadows downward onto the face and is the most common lighting mistake in primary bathrooms.
Accent lighting creates a second mode for the room. Undermount cabinet lighting, LED strips recessed behind a floating vanity, or a backlit mirror all contribute to a space that functions differently in the evening than it does at 7 a.m.
The finish of your light fixtures should match or intentionally contrast your plumbing fixtures. Brushed nickel and matte black read as modern. Warm brass and unlacquered brass have become consistent choices on the North Shore in primary bathrooms with stone or natural wood accents, as seen in projects in Lake Forest and Winnetka where carrara marble counters and brass widespread faucets work together without competing.
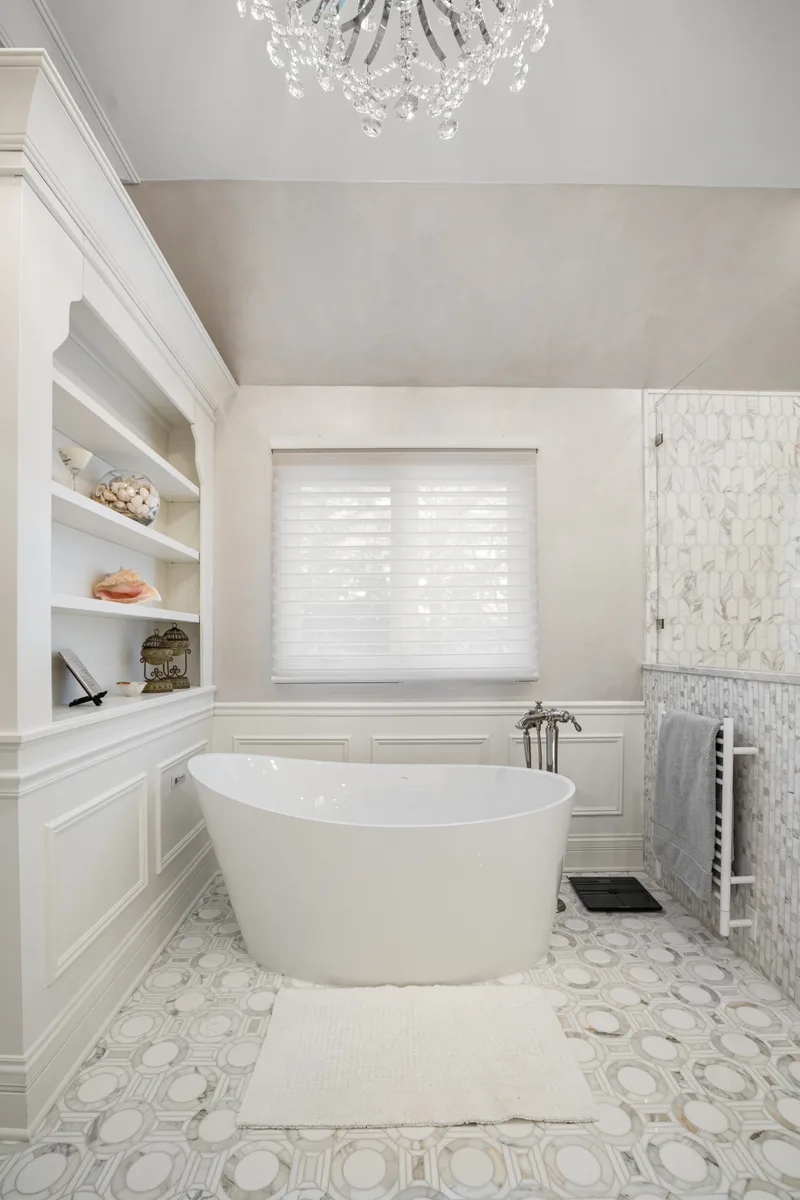
The Case for a Statement Tub, and When to Skip It
A freestanding tub is the single item most often associated with a high-end primary bathroom remodel, but it is not the right call for every floor plan or every household.
When it makes sense: You have at least 55 to 60 square feet of usable bathroom space, you actually use a bathtub regularly, and the plumbing rough-in can be positioned correctly before tile is set. Freestanding tubs require clearance on all sides and a floor supply or wall supply stubbed out to the right location.
What to look for: A clean-lined pedestal or slipper silhouette reads as current. A clawfoot tub works in traditional or transitional interiors and suits the pre-war Colonial and Georgian homes common in Winnetka and Lake Forest. Acrylic and composite resin tubs are lighter and easier to install than cast iron but feel less substantial. Cast iron retains heat longer and tends to outlast acrylic by decades.
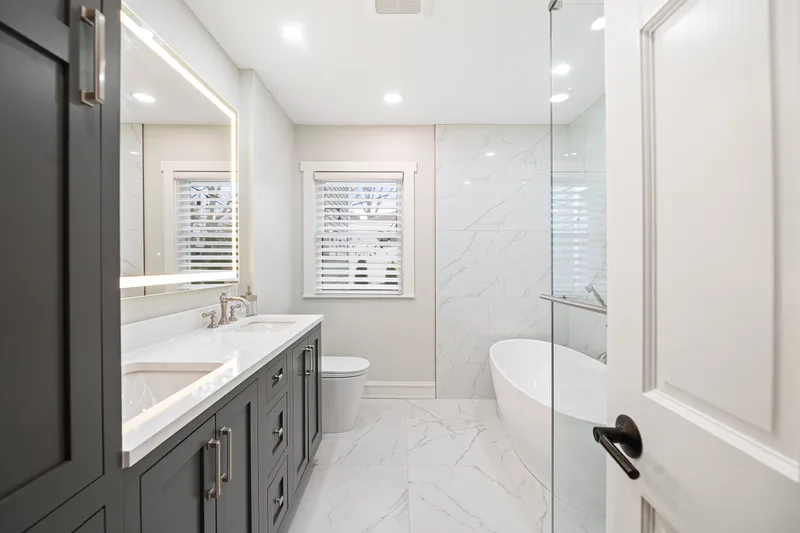
When to skip it: If the floor plan puts the freestanding tub in competition with a properly sized walk-in shower, the shower wins for daily usability. A soaking tub that fits awkwardly or forces the shower to be undersized is a compromise that most homeowners regret. The Lake Bluff primary bathroom project with a charcoal shaker double vanity, marble-look porcelain walls, and freestanding soaking tub worked because the layout had room for both a properly sized frameless glass shower and the tub without either one being compromised.
If you want both and the floor plan allows it, a drop-in tub built into a tile surround is an efficient solution that still delivers the visual impact without requiring the floor clearance a freestanding pedestal demands.
Shower Upgrades That Change the Daily Experience
Shower quality is where a primary bathroom earns its day-to-day value. A well-designed shower surround, the right fixture configuration, and a properly sized enclosure make a meaningful difference every morning.
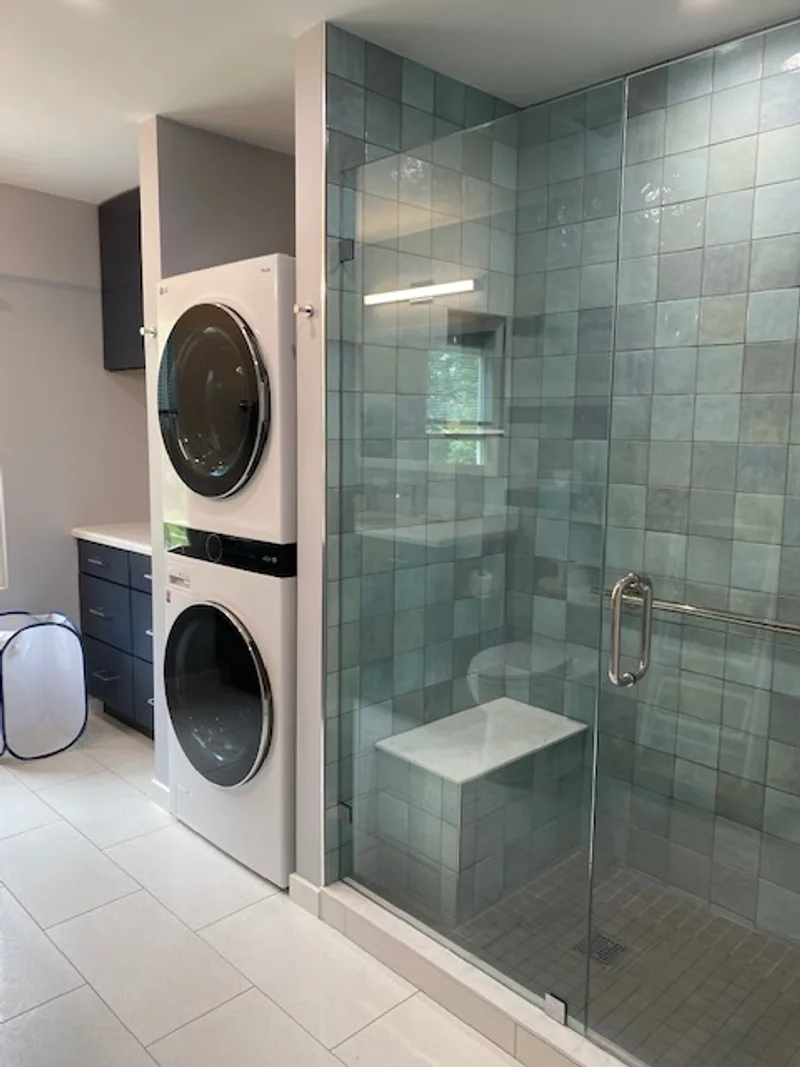
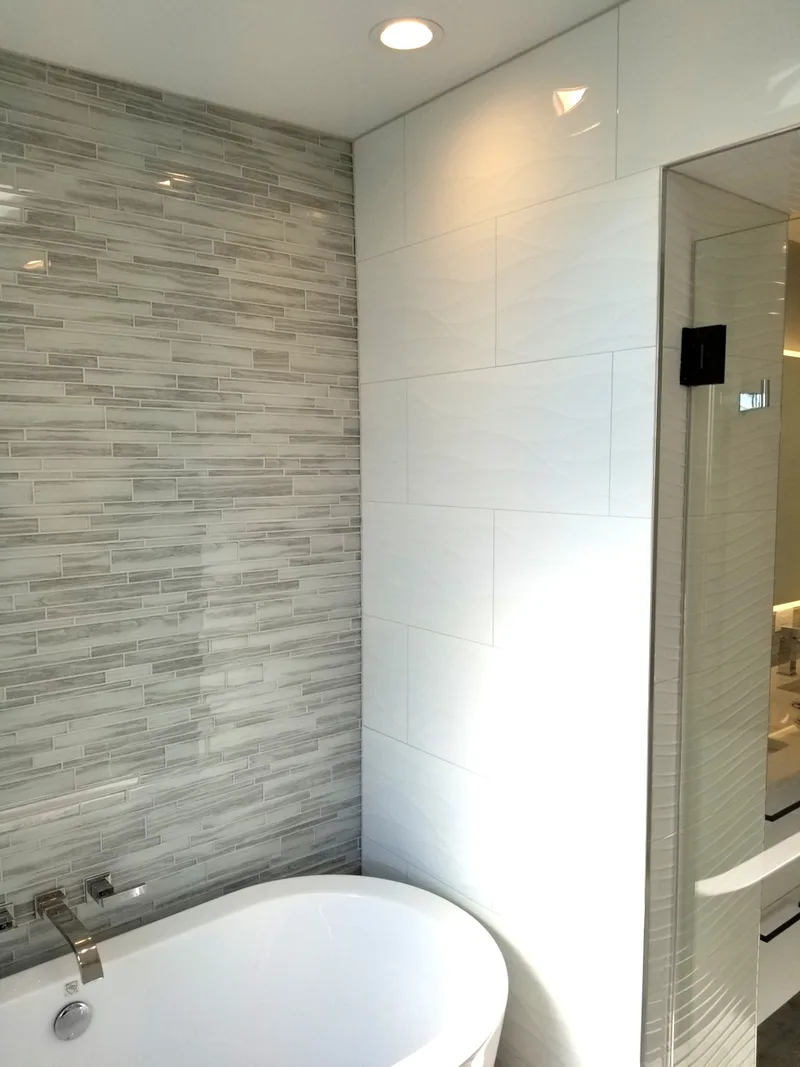
Enclosure approach: Frameless glass panels with minimal hardware are the current standard for primary bathroom showers. They keep sightlines clean and let the tile work carry the visual weight. For a doorless walk-in configuration, the shower needs to be large enough, typically a minimum of 36 by 48 inches for a comfortable entry, with proper slope and drain positioning to prevent water migration. The Wilmette travertine walk-in shower with diagonal-laid large-format tile and hex marble mosaic shower floor shows how frameless glass and a strong tile choice work together without either one overpowering the other.
Fixture options: A fixed overhead rain showerhead, 8 to 12 inches wide, combined with a handheld unit on a slide bar covers most households. Body jets add a spa feel but require additional volume capacity from your water heater. Confirm your system can support them before the rough-in is finalized, not after.
Tile in the shower: Large-format porcelain (24x24 or 12x24) with minimal grout joints reads as clean and contemporary. A full-height tile installation, running floor to ceiling, makes the shower feel taller than a partial tile-to-paint approach. Our bathroom tile guide goes into more detail on format, finish, and material trade-offs.
Shower bench: A built-in tiled bench on the back or side wall adds daily comfort and visual structure. It belongs in the design from the start, not added after framing is done.
Frameless glass lead time: Glass is measured after tile is complete and typically takes 2 to 4 weeks to fabricate and install. On a mid-range renovation, this is routinely the last item on the punch list and the most common reason a project runs past its expected completion date. Plan for it.
Tile, Stone, and Surface Choices That Hold Up
Material selection is where a primary bathroom either reads as cohesive or feels like a collection of expensive choices that do not connect.
Large-format tile: 24x24, 24x48, or larger formats reduce grout lines and make floors and walls feel more unified. They require a flatter substrate than smaller tile; any variation in the subfloor or wall framing telegraphs through at this scale. Substrate prep is a non-negotiable line item, not a place to save money.
Marble and marble-look options: Genuine marble needs sealing at installation and periodic maintenance, and it will etch with acidic cleaners or cosmetics. Porcelain tile in a marble-look finish offers nearly identical visual character with significantly lower maintenance. For primary bathrooms with multiple daily users, porcelain marble-look tile is often the more practical choice. The Lake Forest primary bathroom with carrara marble counters and frameless walk-in shower, and the Lake Zurich primary bath with herringbone tile accent wall, both demonstrate how natural stone elements can anchor a design when they are used selectively rather than throughout.
Wall and floor coordination: The most successful primary bathrooms use tile in a coherent color family with variation in format, finish, or pattern to add interest. Matte floor tile, polished or large-format shower walls, and a contrasting accent in a niche creates a layered look without becoming busy.
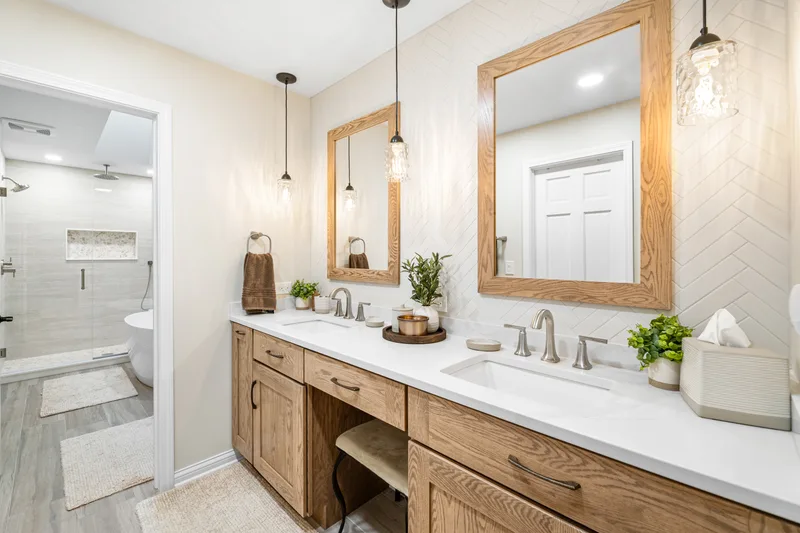
Natural elements: Wood-look porcelain plank flooring, teak shower benches, and stone vanity tops add warmth to what is otherwise a hard-surface environment. The Lake Zurich primary bath with warm oak double vanity, wood-look plank flooring, and herringbone shower accent wall shows how these elements work together. Heated floors are worth considering at this level; our heated bathroom floors guide covers the practical case, installation requirements, and cost.
Hardware Finishes and Fixture Details
Fixture and hardware finish is the detail that ties a primary bathroom together. Inconsistency here reads as unfinished regardless of how expensive the individual components are.
Current finishes: Matte black continues to be used in contemporary and transitional bathrooms across the North Shore, particularly in Northbrook and Glenview remodels where the housing stock skews postwar and the design language is less traditional. Brushed gold and warm brass work in bathrooms with stone or white cabinetry. Brushed nickel is versatile. Polished chrome is classic and will not date.
Where to maintain consistency: At minimum, plumbing fixtures (faucets, shower trim, tub filler), towel bars and rings, toilet paper holder, and cabinet pulls should share a finish family. Mirror frames and light fixtures can introduce a complementary finish as a deliberate accent. The Northbrook primary bath with honey-oak vanity, matte black gooseneck widespread faucet, and matte black ceiling rainhead in the walk-in shower is an example of a finish decision carried consistently through the room.
Vanity considerations: Double vanities with separate mirrors and flanking wall sconces are standard in primary bathroom remodels where the floor plan allows. A floating vanity (wall-mounted) with storage below creates the perception of more floor space and allows for undermount lighting. Both the Lake Forest and Lake Bluff projects used double vanities with quartz counters and undermount sinks as the organizing element for the room.
Medicine cabinets: Recessed medicine cabinets with interior lighting are practical additions that do not consume wall space. In a primary bathroom, a large-format backlit mirror is also a popular option that eliminates the need for separate sconce mounting and provides even task light across the full vanity width.
Planning Before Demolition Begins
The difference between a primary bathroom that photographs well and one that holds up over years of daily use comes down to planning and installation quality. Before demolition, the layout should be finalized, all materials should be specified with lead times confirmed, and the plumbing and electrical rough-in locations should be locked.
Moving plumbing adds roughly $2,000 to $15,000 depending on what moves and how far. Material choices also affect each other: the tile determines substrate requirements, the tub or shower base determines drain placement, and the vanity depth determines clearance for the toilet and door swing. Working through these dependencies before construction starts prevents mid-project changes that drive cost overruns.
For North Shore municipalities, permit requirements apply to full gut bathroom remodels involving plumbing or electrical changes. Wilmette projects over $25,000 or involving structural work require a licensed architect or engineer stamp per Village of Wilmette permit requirements. Winnetka operates a Landmark Preservation Commission that can affect review timelines on older homes. Confirming the permit scope early prevents schedule surprises.
Delta - Bathroom and Kitchen Remodeling handles primary bathroom remodeling projects across the North Shore, from Evanston to Lake Forest. If you are in the planning stage, contact us to review the space and discuss priorities. For broader context on our bathroom work, see our bathroom remodeling page or our service areas page.
Ready to Start Your Project?
Schedule a free consultation. We bring design ideas, material samples, and honest answers.
Get Free Consultation